Author name: TileProf

Black Limestone Sherbourne Before and After Cleaning

Black Limestone Flagstone floor restored in Sherbourne

This Georgian house in the beautiful historic town of Sherbourne, Dorset still had its original floor of black limestone flagstones. These were in a sorry condition, having been smoothed over with a cement screed to make it level for a carpet and, before that, painted at various times with both red and green floor paint.
A combination of cement, hardened carpet glue and old floor paints all needed to be completely removed before I could even begin to clean the original stone beneath.

Black Limestone Sherbourne Before Cleaning

Removing Sealer from Limestone Floor Tiles

After chipping away the areas of cement with a chisel I used an application of Tile Doctor Remove and Go which was left to soak into the stone for a while in order to loosen the old floor paint before steaming and wire-brushing the entire floor. This I followed with an application of Tile Doctor “Pro Clean” scrubbed in with a black buffing pad under fitted to a Numatic buffing machine to further clean the slabs.

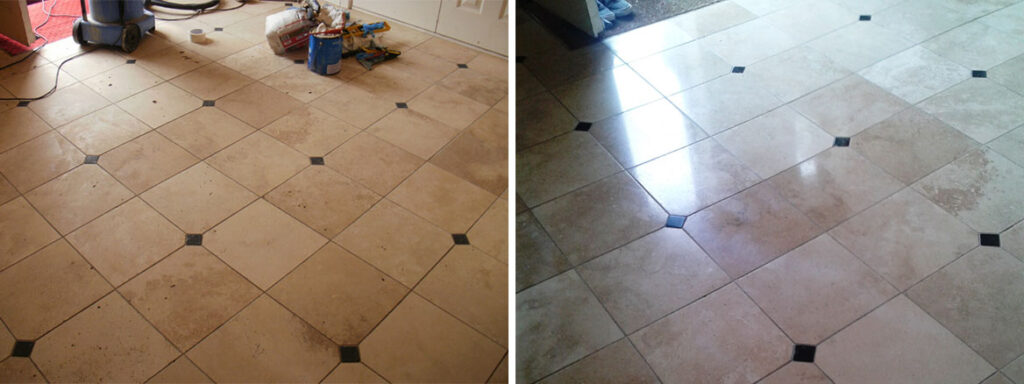
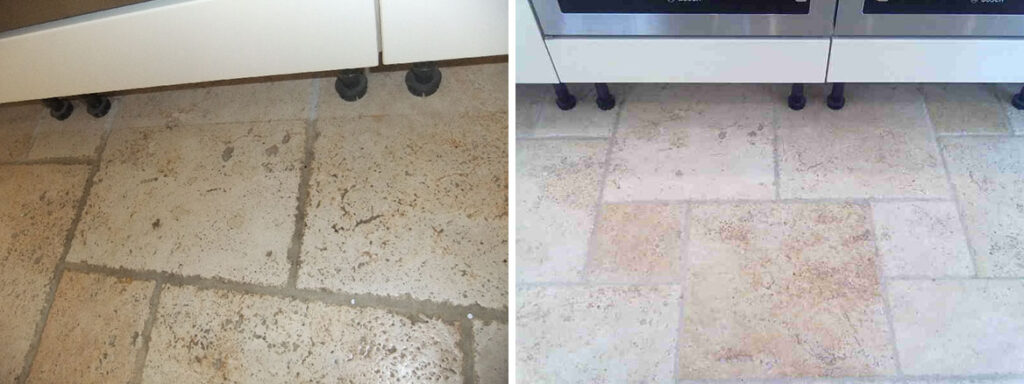
Next step was to cut back and re-polish the Limestone flagstone using of a set of diamond encrusted burnishing pads fitted to a rotary machine. You start with a coarse pad with a little water, then a medium pad, fine pad and finish with a very fine polishing pad rinsing the floor between each pad.

Sealing Limestone Floor Tiles

Following all this treatment the flagstones needed a few days to thoroughly dry out after which I returned to seal them with Tile Doctor “Colour Grow”, a long lasting impregnating sealer which enhanced the natural colour of the tiles and turned them from a drab grey to a rich and shining black.

Black Limestone Sherbourne After Cleaning
 

Black Limestone Floor Polished and Sealed in Dorset

Black Limestone Flagstone floor restored in Sherbourne Read More »

Canford Cliffs Stone Fireplace Before and After Cleaning

Cleaning a Stone Fireplace in Canford Cliffs

This fireplace at a house at Canford Cliffs near Poole, Dorset and was constructed from a mixture of Limestone and Sandstone, both of which had suffered from ingrained soot damage in the forty plus years since in had been installed. The owners of the property wanted it cleaning up and although we tend to focus on tiles the methods and products we use work equally well on stone fireplaces so I was happy to take it on.

Canford Cliffs Stone Fireplace Before Cleaning

Removing Sealer from Limestone Floor Tiles

The first task was to protect the carpet in from of the fireplace from splashing and any potential mess and then I applied a strong mixture of Tile Doctor “Pro Clean” in warm water. It was left to soak in for a short while before being scrubbed into the stone by hand with a grout brush and a brass coated Spid wire brush which helped to brush away the more ingrained dirt. This took off the majority of the soil from the stone and a further application of Pro Clean was applied which I steamed off using an Earlex steamer and then rinsed thoroughly always taking care to minimise any run off.

Sealing Limestone Floor Tiles

Any stone needs to be bone dry before sealing so I left the Fireplace to dry for two days before returning to seal it using a number of coats of Tile Doctor Seal and Go which sank into the porous stones and enriched their colour as well as protecting them from further staining.

Canford Cliffs Stone Fireplace After Cleaning
The fireplace is now looking like new again and has become a really attractive feature.

Stone Fireplace Cleaned and Sealed in Dorset

Cleaning a Stone Fireplace in Canford Cliffs Read More »

Limestone Tiled Floor Canford Cliffs Before and After

Sealing Limestone Floor Tiles at Canford Cliffs

Slightly unusual job this one involving a Limestone tiled floor at a house in Canford Cliffs which is a beautiful part of Dorset near Poole overlooking the sea. The tiles had only recently been laid and then sealed by a tiler, unfortunately however too much sealer had been applied and it had been allowed to dry on the surface of the tiles causing a smeared and messy appearance.

Limestone Tiled Floor Canford Cliffs Before

Removing Sealer from Limestone Floor Tiles

To remove the sealer from the floor the surface needs to be cut back and re-polished using of a set of diamond encrusted burnishing pads fitted to a rotary machine. You start with a coarse pad with a little water, then a medium pad, fine pad and finish with a very fine polishing pad, this takes some time but the effect it quite transforming, it does build up slurry on the floor so it all needs to be rinsed down using water and a wet vacuum to remove the liquids the wet vacuum also helps to get the floor dry.

Sealing Limestone Floor Tiles

The floor was left to fully dry overnight and I returned the next day to seal the Limestone tiles using a coat of Tile Doctor Colour Grow carefully applied using a B&Q paint pad. Colour Grow is an impregnating sealer that fills the pores in the Limestone to prevent other contaminates staining the stone; it’s also a colour enhancing sealer that lifts the natural colours in the Limestone. Once dry the floor was buffed using a Numatic buffing machine fitted with a soft white pad to give a perfect finish to the floor.

Limestone Tiled Floor Canford Cliffs After
The floor is now looking as it should and the customer was delighted with the result, needless to say the tiler was very relieved.

Limestone Floor Polished and Sealed in Dorset

Sealing Limestone Floor Tiles at Canford Cliffs Read More »

Shell Slate at Lytchett Minster Before and After Cleaning

Cleaning and Sealing Shell Slate Kitchen Tiles in Lytchett Minster

This Shell Slate tiled floor was installed in the kitchen of a house in Lytchett Minster and had not been sealed after its installation over twenty years ago and had now become deeply ingrained with dirt which the owner could not remove however hard she tried.

Cleaning Shell Slate Tiles

To clean the tiles I used Tile Doctor Pro-Clean diluted one part cleaner to five parts water, the solution was applied it to the floor and then left to soak in for ten minutes before working it in with a Numatic buffing machine fitted with 17″ medium firm brush. Next the tiles were steamed using an Earlex steamer and stubborn stains cleaned by hand using sections from a cut-up black buffing pad and a Spid brass-coated wire brush where necessary. Being riven slate the floor was too uneven to successfully clean using a black buffing pad fitted to a rotary machine as the sunken parts of the tile would have been missed and so cleaning tile by tile was the only option to ensure the slate was returned to the best possible condition. A stiff brush was also run along the grout lines before thoroughly rinsing the floor to remove any trace of cleaning product.

Shell Slate at Lytchett Minster Before Cleaning

Sealing Shell Slate Tiles

The floor was left to dry overnight and I returned the next day to seal using two coats of Tile Doctor Colour Grow sealer which is a penetrating sealer that occupies the pores in the tile preventing contaminates from lodging there and enhances the many beautiful colours of the Slate as well as leaving a subtle shine to floor.

Shell Slate at Lytchett Minster After Cleaning
The customer was very pleased with the result and said that she hadn’t before seen the true colour of her floor.

Shell Slate Tiled Kitchen Floor Cleaned and Sealed in Dorset

Cleaning and Sealing Shell Slate Kitchen Tiles in Lytchett Minster Read More »

Travertine Tiled Floor Sandbanks Before and After Cleaning

Cleaning a Travertine tiled hallway in Sandbanks

Occasionally I get a call to pop down to Sandbanks on the Dorset Coast which is well known for containing the most expensive property in the UK outside of London. This particular residence had a Travertine tiled hallway which was badly in need of renovation, it had become very soiled and dirt had become trapped in holes that has opened up in the stone over time and now needed cleaning and filling.

Travertine Tiled Floor Sandbanks Before Cleaning

Cleaning and Filling a Travertine Tiled Floor

I began by applying a dilution of Tile Doctor Pro-Clean which was left to soak into the floor for ten minutes before being worked into the tile and grout using a Numatic buffing machine fitted with a medium brush. I then dried the floor using a hot air gun and filled the holes with Harbro Stone Filler which is an epoxy filler as hard as the stone itself. I carefully scraped off the excess filler before leaving it to set overnight.

Burnishing Travertine Tiles

The next day I used 17″ wet and dry paper to remove the excess filler and to cut out some of the deep scratches in the travertine. This I followed by honing and polishing the floor using Tile Doctor burnishing pads which are diamond encrusted and come in a setup of four pads which are applied one after the other from Coarse, Medium, Fine and then Super Fine to restore the surface polish.

Sealing Travertine Tiles

On the third day I returned to seal the Travertine tiles using Tile Doctor Colour Grow which is a colour enhancing impregnating sealer that soaks into the pores of the stone occupying them and in doing so preventing dirt and soil from becoming ingrained into the stone. Colour Grow is also a colour enhancing product that brings out the colour in the stone

Travertine Tiled Floor Sandbanks After Cleaning
Unfortunately I didn’t remember to take a photo of the floor until after the initial clean but the effect of the filling and burnishing pad treatment should be visible.

Travertine Tiled Hallway Burnishing in Dorset

Cleaning a Travertine tiled hallway in Sandbanks Read More »

Yellow Ceramic Tiles Before and After Cleaning in Poole

Cleaning old Yellow Ceramic Floor tiles in Poole

This fifty year old Ceramic tiled floor was installed in the communal parts of a small block of flats in Poole, Dorset. The tiles had not been given a deep clean in a long while and were now ingrained with dirt from many years of wear.

Yellow Ceramic Tiles Before Cleaning in Poole

Cleaning Ceramic Floor Tile and Grout

To clean the tiles a strong dilution of Tile Doctor Pro-Clean was applied a left to soak into the tile for some time before working it into the floor using a rotary machine fitted with a black scrubbing pad. During this process it became clear that there was evidence that the tiles had been previously sealed using a metallised emulsion. This needed to be completely removed by buffing the floor and then steaming it; steaming also removed a myriad of paint spots that had accumulated over the years.

At this stage we took the opportunity to give the grout a good scrub with more Pro-Clean and a stiff hand brush before removing the cleaning solution with a wet vacuum and giving the entire floor a thorough rinse to remove and trace of cleaning product.

Sealing Ceramic Floor Tiles

The tiles were left to dry off overnight and we came back the next day to see if further work was needed. Now normally Ceramic tiles have a glazed surface that a sealer cannot take to however these tiles being were very old and the glaze had been worn off so sealed a small test are to see if it would take. The test was successful so I proceeded to seal the whole floor using Tile Doctor Colour Grow.

Due to the age of the tiles some were more faded than others which I could do nothing about however they looked generally clean and bright after restoration and the new Colour Grow sealer should provide protection for years to come.

Yellow Ceramic Tiles After Cleaning in Poole
 

Old Ceramic Tiled Floor Cleaned in Dorset

Cleaning old Yellow Ceramic Floor tiles in Poole Read More »

Tumbled Marble in Dewlish Before and After Cleaning and Sealing

Cleaning a Tumbled Marble floor in Dewlish near Dorchester

This 50m2 Tumbled Marble tiled floor in Dewlish, near Dorchester had not been deep cleaned and re-sealed for at least five years and showed signs of the normal wear and tear associated with a busy kitchen/dining room and a dog that enjoyed muddy walks. The old sealer was now breaking down allowing dirt to become ingrained in the Marble making it difficult to clean.

Tumbled Marble in Dewlish Before Cleaning

Stripping a Tumbled Marble Floor

To restore the surface finish it needed to be burnished using a set of diamond encrusted burnishing pads. The pads come in a number of different grades from coarse (used to strip off sealers and dirt from the Marble) too very fine (used for final polishing) and are applied one after another starting with the coarse pad and moving through to the very fine pad towards the end. Each stage requires a little water which captures the soil and is rinsed away and removed with a wet vacuum. This process completely removed the old sealer and surfaces scratches with a new shine. The floor was given a thorough wash down at this point again using a wet vacuum to remove as much water as possible from the surface before leaving it to dry for the evening.

Sealing Tumbled-Marble Tiles

The next day the Marble had dried and I started to seal the tiles using two coats of Tile Doctor Colour Grow sealer which was first applied to a couple of test tiles first to ensure it gave the effect the customer was looking for.

Tumbled Marble in Dewlish During Sealing
Colour Grow is a colour enhancing sealer that brings out the natural colour of the tile and certainly the customer was pleased with the results so the sealing work continues until the whole 50m2 floor had been sealed with two coats.

Tumbled Marble in Dewlish After Cleaning and Sealing
When the whole fifty square metres of floor had been sealed using Colour Grow the effect was dramatic and the owners were so pleased with the result that they invited over a friend with a similar stone floor who immediately asked for her floor to be done in the same way.

Tumbled Marble Floor Restoration in Dewlish near Dorchester

Cleaning a Tumbled Marble floor in Dewlish near Dorchester Read More »

Terracotta Tile Before and After Cleaning

Terracotta Tile and Grout Cleaned Following Freezer Leak

This small Terracotta tiled floor with tumbled travertine inserts at a house in Middlemarsh, Dorset was around 25M² and had been in place for over ten years, since before the owner moved in. After a recent freezer leak caused the tiles and grout to become stained in the utility area; the customer was looking to either clean them or replace them as she wasn’t that keen on them anyway.

Terracotta Tile During Cleaning
After a demonstration of what could be achieved she was happy to go ahead and have them stripped and resealed as opposed to the more expensive replacement option.

Terracotta Tile Before Cleaning

Cleaning Terracotta Tiles

The floor was covered in a strong dilution of Tile Doctor Pro-Clean and this was left to dwell on the floor to allow it to soak into the tile and get to work on the dirt and breakdown any remaining sealer. The solution was then worked into the tile and grout using a heavy 17″ rotary scrubbing machine and then rinsed down using a high pressure wash to remove the soiled solution and neutralise the floor of any remaining cleaning solution before sealing. The grout proved to be stubborn to clean so we had to repeat the process a second time and use stiff hand brushes along the grout lines to get them clean.

You should be able to appreciate from the photographs below how we have managed to get the floor back to its original state and the difference in the grout particularly which was looking very dark prior to cleaning.

Terracotta Tile After Cleaning Terracotta Tile After Cleaning

Sealing Terracotta Floor Tiles

The customer had opted to seal the floor themselves with Tile Doctor Seal and Go naturally I was keen to see how it came out so I asked them to send me some photographs a couple of which are shown below. The final result is a practically new floor and the customer is very happy with it.

Terracotta Tile After Sealing Terracotta Tile After Sealing


Terracotta Tiles Transformed in Dorset

Terracotta Tile and Grout Cleaned Following Freezer Leak Read More »

Re-Polished Crema Marble Tiles

Removing scratches from Crema Marble tiles in Bovington

Photographs below of a beautiful pale Crema Marble tiled floor in Bovington, Dorset; it had suffered from scratching and the general wear and tear over the short two years since it had been immaculately laid and also sealed. The customer wanted the floor scratches polished out and made to look like it had just been installed again.

Scratched Crema Marble Tiles Scratched Crema Marble Tiles

Marble Tile Cleaning and Polishing

A sealer is not recommended on this type of floor as it’s so soft and will need regular maintenance to keep it looking tip top, the sealer can’t stop wear and tear and it would just mean more work to remove the sealer whilst polishing. The polishing process itself seals the floor to a good degree anyway.

Re-polishing the floor involved the use of a set of diamond encrusted burnishing Pads fitted to a rotary buffing machine, the pads come in a set and are very effective at restoring the shine back on Marble, Limestone and Travertine etc. You start with the red pad which is more abrasive and removes sealers with a little water before moving onto the White, Yellow and Green polishing pads to get a high shine glossy finish.

Re-Polished Crema Marble Tiles Re-Polished Crema Marble Tiles

After the treatment the scratches were gone and the floor was uniform in appearance, it took a whole day of polishing and a set of pads to acquire the right lustre; Travertine and Limestone with a polished finish can also be treated the same way

Crema Marble Floor Tiles Re-polished in Bovington, Dorset

Removing scratches from Crema Marble tiles in Bovington Read More »

Quarry Tiles Floor Restored

200 year old Quarry Tiled Floor Restored in Milton Abbas

This Quarry tiled floor in Milton Abbas, Dorset was over 200 years old and had suffered from various attempts at maintenance over the years. Built at a time before the invention of damp proof membranes there was evidence of efflorescence where damp had risen up through the floor and deposited salts on the tile surface leaving white staining.

Quarry Tiles Floor Before

Cleaning and Efflorescence removal

Tile Doctor Grout Clean-Up was applied to remove the Efflorescence, it’s an Acid based product more commonly used for the removal of grout from the tile surface but also just as handy for the removal of mineral deposits, rust stains as well as efflorescence; I should warn that you can’t leave the product on the tile surface for too long as being an Acid it can damage the tile so it needs to be washed off with clean water soon afterwards.

Once we had tackled the efflorescence problem we set about cleaning and neutralising the floor using a dilution of Tile Doctor Pro-Clean mixed 50/50 with NanoTech Ultra Clean which adds nano sized abrasive particles to the solution to make a more effective cleaner. We allowed this to dwell for a short while before agitating it with a rotary machine fitted with a black scrubbing pad working the solution into the floor. Once we were happy with floor it was washed down with a high pressure spinning tool which is a special floor cleaning machine. Once clean the dirty solution was removed using a Vet Vacuum and then left to dry.

Quarry Tiles Floor Cleaning Quarry Tiles Floor During

Sealing Quarry Tiles

When the floor was dry we applied Tile Doctor Seal and Go which is a specially formulated water-based blended sealer ideal for Quarry tiles that provides both a stain resistant surface seal with a durable low-sheen finish, six coats were required to completely seal the floor.

Quarry Tiles Floor During
I think you will agree the floor has been transformed and given a new lease of life.

Efflorescence removed from 200 year old Quarry Tiled floor in Dorset

200 year old Quarry Tiled Floor Restored in Milton Abbas Read More »

Porcelain Stone effect Tiles Before and After

Removing Varnish from Porcelain stone effect tiles in Dorset

This Porcelain tiled floor with a faux stone pattern had previously been sealed with a type of Varnish to give them a shiny appearance however the coating hadn’t taken and had come away allowing dirt to get trapped onto surface giving a dirty appearance. It’s a fact that almost all Ceramic and most Porcelain tiles won’t accept a sealer and if they do it has to be one that works with Micro-Porous tiles.

Porcelain Stone effect Tiles Before

Cleaning Porcelain Floor Tile and Grout

A strong coating remove product was required to shift the remaining varnish from the tiles so we applied a solution of Tile Doctor Remove and Go combined 50/50 with Nano-Tech Ultra Clean which contains tiny abrasive particles. This solution was left to dwell on the tile for some time before working it into the floor using a rotary machine fitted with a black scrubbing pad. We took the opportunity to scrub the grout at this point as well using a stiff hand brush before removing the cleaning solution using a wet vacuum which I highly recommend for removing liquids from floors. The floor was rinsed with clean water and checked for any further issues; unfortunately the Grout did not respond as well as we had hoped from the cleaning and still had evidence of staining so after checking with the owner we proceeded to apply a grout colourant.

The stripping of the Varnish, cleaning and Grout colouring made a big difference on the floor appearance and now looks revitalised after we had finished and the customer was happy not seal them again.

Porcelain Stone effect Tiles After
 

Porcelain Tiled Floor Cleaned in Dorset

Removing Varnish from Porcelain stone effect tiles in Dorset Read More »

Marble EnSuite Floor Before and After

Polishing and Sealing a Marble Tiled En-Suite in Bridport

These Marble Tiles were laid in an en-suite bathroom at a house in Bridport, the main problems to be addressed WERE that the floor had dulled and lost most of its shine, there was also a coffee stain in the corner which needed to be addressed.

Marble EnSuite Floor Before

Removing Stains from Marble Tile

To remove the ingrained coffee stain we used Tile Doctor Reduxa, which is a penetrating stain remover used in conjunction with a heat gun, it can take a little time to work but its very easy to apply, I’ve copied the instructional video below so you can see for yourself.

Polishing Marble Floor Tiles

Before polishing the marble tiled floor we set about giving it a quick clean using a mild dilution of Tile Doctor Pro-Clean to ensure there was no grit on the floor that could lead to deep scratches when polishing. The floor was then rinsed with clean water to remove and chemical residue and we then began polishing the floor using a set of burnishing pads fitted to a heavy buffing machine. There are four pads in the set each encrusted with very fine diamonds, you start the process with the Red pad which is designed to remove sealers, followed by the White polishing pad for the removal of ingrained dirt then the Yellow smoothing pad and finally the Green polishing pad.

Sealing Marble Tiles

The floor was then washed down to remove any remnants from the polishing process and dried off so it could be sealed. To seal the floor we used a single coat of Tile Doctor Ultra Seal which is a premium penetrating sealer that gives a natural appearance and will provide long lasting stain protection going forward.

The customer requested the coffee stain removed and a high shine finish and was not disappointed, my photography skills aren’t brilliant but hopefully you can also see the improvement.

Marble EnSuite Floor After
 

Cleaning and Polishing Marble Bathroom Tiles in Dorset

Polishing and Sealing a Marble Tiled En-Suite in Bridport Read More »

Sandstone Floor Before and After Cleaning and Sealing

Cleaning and Sealing a Dirty Sandstone Tiled Floor in Dorset

You can see from the photographs how soiled this Sandstone tiled floor was, any sealer had pretty much been worn away and dirt had penetrated into the pores of the sandstone flagstones.

Sandstone Floor before Cleaning

Cleaning a Sandstone Tiled Floor

We cleaned the floor using Tile Doctor Pro-Clean diluted with 10 parts warm water, Pro-Clean has an alkaline formula so it’s safe to use on natural stone, acidic cleaning products can eat away at protective coatings and even dissolve calcareous stone over time. The cleaning agent was worked into the stone surface using a rotary machine fitted with a black scrubbing pad; we also used a stiff hand brush on the grout lines as the machine can struggle here. The soiled solution was rinsed off with clean water which was removed with a wet vacuum which is a great time saver when you need to suck water off a floor. There were a few areas that needed further attention so we repeated the process until we were satisfied, there were one or two areas where stains had penetrated through to the grit in the Sandstone but we had managed to lighten them significantly, we then left for the evening so the floor could dry overnight.

Sealing a Sandstone Tiled Floor

We came back the next day and tested the floor with a damp meter in a few different locations to make sure no dampness remained in the stone. The sandstone was dry so we proceeded to seal the floor with Tile Doctor Seal and Go which gives a nice low sheen finish. Sandstone is fairly porous to it took five coats of sealer in the end, the sealer also reduced the appearance of the stains once it had fully dried and I think you will agree from the photographs there was quite an improvement.

Sandstone Floor after Cleaning and Sealing
 

Sandstone Floor Cleaned and Sealed

Cleaning and Sealing a Dirty Sandstone Tiled Floor in Dorset Read More »

Reproduction Victorian Tiled Floor Before and After Cleaning

Reproduction Victorian Tiled Floor Cleaned and Sealed

This reproduction Victorian tiled floor comprised around 20sqm in the hall and dining room. It had previously been sealed using a rubber based sealer that had got dirty over time, the problem with wax and rubber based sealers especially is that dirt eventually gets ingressed in the sealer and then it just becomes un-cleanable.

Reproduction Victorian Tiled Floor Before Cleaning

Cleaning the Victorian Tiled Floor

The first step was to remove the old sealer with a product called Tile Doctor Remove and Go which is a powerful coatings remover, once applied its best to leave it for a while to soak in before scrubbing the floor with a rotary machine fitted with a black scrubbing pad; A steamer was used to deal with stubborn areas. The floor was then deep cleaned using Tile Doctor Pro-Clean which is a strong alkaline tile cleaner and the floor scrubbed again using a rotary machine fitted with black scrubbing pad to work the cleaning solution into the floor. The soiled solution was removed from the tiled floor using a wet vacuum and then washed down using a hot pressure wash.

Reproduction Victorian Tiled Floor After Cleaning

Sealing a Victorian Tiled Floor

We left the floor to try for a few days before coming back to seal it using Tile Doctor Colour Grow which is a colour intensifying penetrating sealer providing durable surface protection whilst allowing the surface to breath.

Reproduction Victorian Tiled Floor After Cleaning
 

Reproduction Victorian Tiled Floor cleaned and re-sealed in Dorset

Reproduction Victorian Tiled Floor Cleaned and Sealed Read More »

Travertine Floor Before and After Cleaning

Cleaning an antiqued style Travertine tiled floor

I had a call from a lady who wanted the Travertine tiled floor in her kitchen cleaned, the Travertine tiles actually extended further into the adjacent room but in this case it was only the kitchen she was concerned with. The sealer that had been used on the floor was ‘Lithofin Stain Stop’ which is sold primarily to the domestic market; it’s an appropriate sealer for Travertine but in a high traffic area such as this kitchen it had been worn down allowing dirt to get trapped in the Travertine.

Antique Terracotta Before Photo Antique Terracotta Before Photo

Cleaning a Travertine Tiled Floor

The remaining sealer was easily removed using a strong solution of Tile Doctor Pro-Clean which is a heavy duty cleaner and stripper. I removed the kick boards from under the kitchen units and then proceeded to work in the Pro-Clean using a rotary machine fitted with a black scrubbing pad. This was followed up with a manual scrub of the grout lines using a stiff brush as machines struggle to reach into the dip between the tiles. Once clean the dirty solution was removed using a Vet Vacuum and then washed down a number of times with clean water to neutralise the floor before re-sealing.

Sealing Travertine Tiles

Since this was a relatively small area of a 60m2 we re-applied the same sealer to ensure it would match up the rest of the floor. Personally for Travertine I always recommend Tile Doctor Ultra-Seal which is a penetrating sealer giving a natural finish especially designed for food preparation areas such as kitchens, another option to consider is Tile Doctor Colour Grow which brings out the deep colour in the stone.

Antique Terracotta After Photo Antique Terracotta After Photo

The customer was pleased with results and will most likely be asking us to return later to strip back the entire floor and re-seal.

Cleaning a Travertine Tiled Floor in a Kitchen

Cleaning an antiqued style Travertine tiled floor Read More »

Victorian Tiled Floor Before and After sealing with colour grow

Victorian Tiled Floor hidden under Carpet restored

This Victorian tiled floor had been discovered under a carpet in a house in Blandford Forum by the customer and they wanted it restored back as close to its original condition as possible. The floor had been preserved well under the carpet although it had lost its vibrance and there was evidence of adhesive staining along the perimeter so I suspect the carpet had originally been glued to floor.

Victorian Tiled Floor before Cleaning

Cleaning the Victorian Tiled Floor

Cleaning the floor was straightforward and just needed a deep clean using Tile Doctor Pro-Clean which is a strong alkaline tile cleaning product together with a rotary machine fitted with black scrubbing pad to work the cleaning solution into the floor. The soiled solution was removed from the tiled floor using a wet vacuum and then washed down with a hot pressure wash. To remove the adhesive staining we used Tile Doctor Remove and Go which is a multi-purpose coatings stripper that will usually remove pretty much anything, unfortunately even when applied with a steamer we couldn’t remove the staining completely; sometimes damage and stains to old tiles like this are permanent and you can never guarantee removal of everything all you can do is your best.

Victorian Tiled Floor Midway through cleaning

Sealing a Victorian Tiled Floor

In order to blend in the stained tiles we choose to seal the floor with Tile Doctor Colour Grow which is a colour intensifying penetrating sealer providing durable surface protection whilst allowing the surface to breath, overtime further coats of Colour Grow will help to blend in the staining. All in all the results were fantastic and the floor was well worth restoring despite the permanent stain.

Andrew was very polite, turned up when he said he would, rang the day before to say what time etc he would be here. He explained everything very well. – Mrs. Clarke

Victorian Tiled Floor after sealing with colour grow

Victorian Tiled Floor cleaned and sealed in Blanford Forum

Victorian Tiled Floor hidden under Carpet restored Read More »

Scroll to Top