Dorchester Tile Cleaning

Dorchester Tile Cleaning

Welcome to my Work History archive where you will find examples of the cleaning and renovation of tiles carried out in Dorchester.

Chinese Rough Slate Before and After Cleaning Dorchester

Cleaning and Sealing Rough Chinese Slate Floor Tiles in Dorchester

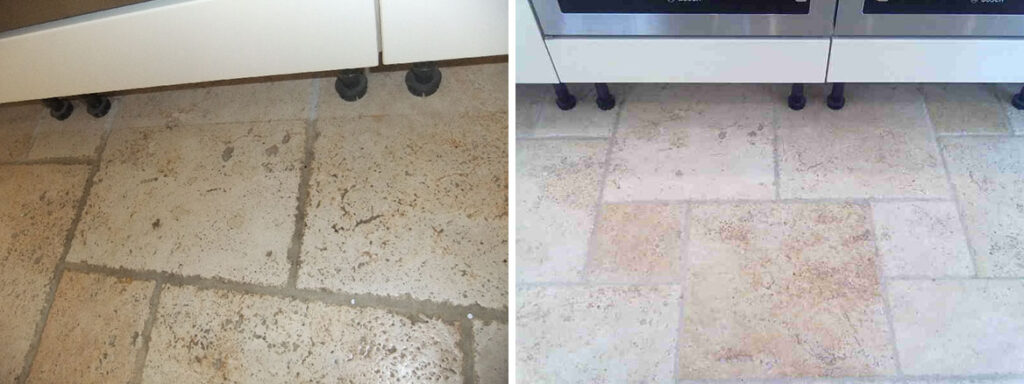
The photographs below are of rough Chinese Slate floor tiles installed at a house in Dorchester; they had not been deep cleaned in a long time and the combination of pets and grandchildren had taken its toll on the floor. Rough Slate from China is a relatively inexpensive product and although long lasting and value for money the texture of the Slate is difficult to maintain and thus difficult to keep clean even if fully sealed

Chinese rough slate before cleaning Dorchester

Cleaning Chinese Slate Tiles

To clean the tiles I used a strong dilution of Tile Doctor Pro-Clean which was left to soak into the Slate for a good ten minutes before working it in with a buffing machine fitted with a black scrubbing pad. This action removed the ground in dirt and any old sealer and a stiff brush was then run along the grout lines with more Pro-Clean to get them as clean as possible. The floor was then rinsed thoroughly and any stubborn areas retreated; a wet vacuum was used to extract the soiled water from the surface of the stone in order to get it as dry as possible.

Sealing Chinese Slate Tiles

The floor was left to dry overnight and I returned the next day to seal using three coats of Tile Doctor Seal and Go sealer which is a water based sealer (so no smell) that leaves a nice subtle shine to floor.

Chinese rough slate after cleaning Dorchester
The slate and the grout looked really dull and dirty before we started and now the floor looks like it was recently laid.

For aftercare we don’t recommend the use of a Floor Steamer as they work on a 100 degrees and this damages the sealer; for regular cleaning use Tile Doctor Ph Neutral Cleaner using a two bucket system, whereby you apply the cleaning solution with a jug, wipe the floor and then squeeze off the excess into the second bucket, this stops you reapplying dirty water onto a clean floor..

Chinese Slate Tiled Floor Cleaned and Sealed in Dorset

Cleaning and Sealing Rough Chinese Slate Floor Tiles in Dorchester Read More »

Black Limestone Sherbourne Before and After Cleaning

Black Limestone Flagstone floor restored in Sherbourne

This Georgian house in the beautiful historic town of Sherbourne, Dorset still had its original floor of black limestone flagstones. These were in a sorry condition, having been smoothed over with a cement screed to make it level for a carpet and, before that, painted at various times with both red and green floor paint.
A combination of cement, hardened carpet glue and old floor paints all needed to be completely removed before I could even begin to clean the original stone beneath.

Black Limestone Sherbourne Before Cleaning

Removing Sealer from Limestone Floor Tiles

After chipping away the areas of cement with a chisel I used an application of Tile Doctor Remove and Go which was left to soak into the stone for a while in order to loosen the old floor paint before steaming and wire-brushing the entire floor. This I followed with an application of Tile Doctor “Pro Clean” scrubbed in with a black buffing pad under fitted to a Numatic buffing machine to further clean the slabs.

Next step was to cut back and re-polish the Limestone flagstone using of a set of diamond encrusted burnishing pads fitted to a rotary machine. You start with a coarse pad with a little water, then a medium pad, fine pad and finish with a very fine polishing pad rinsing the floor between each pad.

Sealing Limestone Floor Tiles

Following all this treatment the flagstones needed a few days to thoroughly dry out after which I returned to seal them with Tile Doctor “Colour Grow”, a long lasting impregnating sealer which enhanced the natural colour of the tiles and turned them from a drab grey to a rich and shining black.

Black Limestone Sherbourne After Cleaning
 

Black Limestone Floor Polished and Sealed in Dorset

Black Limestone Flagstone floor restored in Sherbourne Read More »

Tumbled Marble in Dewlish Before and After Cleaning and Sealing

Cleaning a Tumbled Marble floor in Dewlish near Dorchester

This 50m2 Tumbled Marble tiled floor in Dewlish, near Dorchester had not been deep cleaned and re-sealed for at least five years and showed signs of the normal wear and tear associated with a busy kitchen/dining room and a dog that enjoyed muddy walks. The old sealer was now breaking down allowing dirt to become ingrained in the Marble making it difficult to clean.

Tumbled Marble in Dewlish Before Cleaning

Stripping a Tumbled Marble Floor

To restore the surface finish it needed to be burnished using a set of diamond encrusted burnishing pads. The pads come in a number of different grades from coarse (used to strip off sealers and dirt from the Marble) too very fine (used for final polishing) and are applied one after another starting with the coarse pad and moving through to the very fine pad towards the end. Each stage requires a little water which captures the soil and is rinsed away and removed with a wet vacuum. This process completely removed the old sealer and surfaces scratches with a new shine. The floor was given a thorough wash down at this point again using a wet vacuum to remove as much water as possible from the surface before leaving it to dry for the evening.

Sealing Tumbled-Marble Tiles

The next day the Marble had dried and I started to seal the tiles using two coats of Tile Doctor Colour Grow sealer which was first applied to a couple of test tiles first to ensure it gave the effect the customer was looking for.

Tumbled Marble in Dewlish During Sealing
Colour Grow is a colour enhancing sealer that brings out the natural colour of the tile and certainly the customer was pleased with the results so the sealing work continues until the whole 50m2 floor had been sealed with two coats.

Tumbled Marble in Dewlish After Cleaning and Sealing
When the whole fifty square metres of floor had been sealed using Colour Grow the effect was dramatic and the owners were so pleased with the result that they invited over a friend with a similar stone floor who immediately asked for her floor to be done in the same way.

Tumbled Marble Floor Restoration in Dewlish near Dorchester

Cleaning a Tumbled Marble floor in Dewlish near Dorchester Read More »

Re-Polished Crema Marble Tiles

Removing scratches from Crema Marble tiles in Bovington

Photographs below of a beautiful pale Crema Marble tiled floor in Bovington, Dorset; it had suffered from scratching and the general wear and tear over the short two years since it had been immaculately laid and also sealed. The customer wanted the floor scratches polished out and made to look like it had just been installed again.

Scratched Crema Marble Tiles Scratched Crema Marble Tiles

Marble Tile Cleaning and Polishing

A sealer is not recommended on this type of floor as it’s so soft and will need regular maintenance to keep it looking tip top, the sealer can’t stop wear and tear and it would just mean more work to remove the sealer whilst polishing. The polishing process itself seals the floor to a good degree anyway.

Re-polishing the floor involved the use of a set of diamond encrusted burnishing Pads fitted to a rotary buffing machine, the pads come in a set and are very effective at restoring the shine back on Marble, Limestone and Travertine etc. You start with the red pad which is more abrasive and removes sealers with a little water before moving onto the White, Yellow and Green polishing pads to get a high shine glossy finish.

Re-Polished Crema Marble Tiles Re-Polished Crema Marble Tiles

After the treatment the scratches were gone and the floor was uniform in appearance, it took a whole day of polishing and a set of pads to acquire the right lustre; Travertine and Limestone with a polished finish can also be treated the same way

Crema Marble Floor Tiles Re-polished in Bovington, Dorset

Removing scratches from Crema Marble tiles in Bovington Read More »

Quarry Tiles Floor Restored

200 year old Quarry Tiled Floor Restored in Milton Abbas

This Quarry tiled floor in Milton Abbas, Dorset was over 200 years old and had suffered from various attempts at maintenance over the years. Built at a time before the invention of damp proof membranes there was evidence of efflorescence where damp had risen up through the floor and deposited salts on the tile surface leaving white staining.

Quarry Tiles Floor Before

Cleaning and Efflorescence removal

Tile Doctor Grout Clean-Up was applied to remove the Efflorescence, it’s an Acid based product more commonly used for the removal of grout from the tile surface but also just as handy for the removal of mineral deposits, rust stains as well as efflorescence; I should warn that you can’t leave the product on the tile surface for too long as being an Acid it can damage the tile so it needs to be washed off with clean water soon afterwards.

Once we had tackled the efflorescence problem we set about cleaning and neutralising the floor using a dilution of Tile Doctor Pro-Clean mixed 50/50 with NanoTech Ultra Clean which adds nano sized abrasive particles to the solution to make a more effective cleaner. We allowed this to dwell for a short while before agitating it with a rotary machine fitted with a black scrubbing pad working the solution into the floor. Once we were happy with floor it was washed down with a high pressure spinning tool which is a special floor cleaning machine. Once clean the dirty solution was removed using a Vet Vacuum and then left to dry.

Quarry Tiles Floor Cleaning Quarry Tiles Floor During

Sealing Quarry Tiles

When the floor was dry we applied Tile Doctor Seal and Go which is a specially formulated water-based blended sealer ideal for Quarry tiles that provides both a stain resistant surface seal with a durable low-sheen finish, six coats were required to completely seal the floor.

Quarry Tiles Floor During
I think you will agree the floor has been transformed and given a new lease of life.

Efflorescence removed from 200 year old Quarry Tiled floor in Dorset

200 year old Quarry Tiled Floor Restored in Milton Abbas Read More »

Porcelain Stone effect Tiles Before and After

Removing Varnish from Porcelain stone effect tiles in Dorset

This Porcelain tiled floor with a faux stone pattern had previously been sealed with a type of Varnish to give them a shiny appearance however the coating hadn’t taken and had come away allowing dirt to get trapped onto surface giving a dirty appearance. It’s a fact that almost all Ceramic and most Porcelain tiles won’t accept a sealer and if they do it has to be one that works with Micro-Porous tiles.

Porcelain Stone effect Tiles Before

Cleaning Porcelain Floor Tile and Grout

A strong coating remove product was required to shift the remaining varnish from the tiles so we applied a solution of Tile Doctor Remove and Go combined 50/50 with Nano-Tech Ultra Clean which contains tiny abrasive particles. This solution was left to dwell on the tile for some time before working it into the floor using a rotary machine fitted with a black scrubbing pad. We took the opportunity to scrub the grout at this point as well using a stiff hand brush before removing the cleaning solution using a wet vacuum which I highly recommend for removing liquids from floors. The floor was rinsed with clean water and checked for any further issues; unfortunately the Grout did not respond as well as we had hoped from the cleaning and still had evidence of staining so after checking with the owner we proceeded to apply a grout colourant.

The stripping of the Varnish, cleaning and Grout colouring made a big difference on the floor appearance and now looks revitalised after we had finished and the customer was happy not seal them again.

Porcelain Stone effect Tiles After
 

Porcelain Tiled Floor Cleaned in Dorset

Removing Varnish from Porcelain stone effect tiles in Dorset Read More »

Sandstone Floor Before and After Cleaning and Sealing

Cleaning and Sealing a Dirty Sandstone Tiled Floor in Dorset

You can see from the photographs how soiled this Sandstone tiled floor was, any sealer had pretty much been worn away and dirt had penetrated into the pores of the sandstone flagstones.

Sandstone Floor before Cleaning

Cleaning a Sandstone Tiled Floor

We cleaned the floor using Tile Doctor Pro-Clean diluted with 10 parts warm water, Pro-Clean has an alkaline formula so it’s safe to use on natural stone, acidic cleaning products can eat away at protective coatings and even dissolve calcareous stone over time. The cleaning agent was worked into the stone surface using a rotary machine fitted with a black scrubbing pad; we also used a stiff hand brush on the grout lines as the machine can struggle here. The soiled solution was rinsed off with clean water which was removed with a wet vacuum which is a great time saver when you need to suck water off a floor. There were a few areas that needed further attention so we repeated the process until we were satisfied, there were one or two areas where stains had penetrated through to the grit in the Sandstone but we had managed to lighten them significantly, we then left for the evening so the floor could dry overnight.

Sealing a Sandstone Tiled Floor

We came back the next day and tested the floor with a damp meter in a few different locations to make sure no dampness remained in the stone. The sandstone was dry so we proceeded to seal the floor with Tile Doctor Seal and Go which gives a nice low sheen finish. Sandstone is fairly porous to it took five coats of sealer in the end, the sealer also reduced the appearance of the stains once it had fully dried and I think you will agree from the photographs there was quite an improvement.

Sandstone Floor after Cleaning and Sealing
 

Sandstone Floor Cleaned and Sealed

Cleaning and Sealing a Dirty Sandstone Tiled Floor in Dorset Read More »

Reproduction Victorian Tiled Floor Before and After Cleaning

Reproduction Victorian Tiled Floor Cleaned and Sealed

This reproduction Victorian tiled floor comprised around 20sqm in the hall and dining room. It had previously been sealed using a rubber based sealer that had got dirty over time, the problem with wax and rubber based sealers especially is that dirt eventually gets ingressed in the sealer and then it just becomes un-cleanable.

Reproduction Victorian Tiled Floor Before Cleaning

Cleaning the Victorian Tiled Floor

The first step was to remove the old sealer with a product called Tile Doctor Remove and Go which is a powerful coatings remover, once applied its best to leave it for a while to soak in before scrubbing the floor with a rotary machine fitted with a black scrubbing pad; A steamer was used to deal with stubborn areas. The floor was then deep cleaned using Tile Doctor Pro-Clean which is a strong alkaline tile cleaner and the floor scrubbed again using a rotary machine fitted with black scrubbing pad to work the cleaning solution into the floor. The soiled solution was removed from the tiled floor using a wet vacuum and then washed down using a hot pressure wash.

Reproduction Victorian Tiled Floor After Cleaning

Sealing a Victorian Tiled Floor

We left the floor to try for a few days before coming back to seal it using Tile Doctor Colour Grow which is a colour intensifying penetrating sealer providing durable surface protection whilst allowing the surface to breath.

Reproduction Victorian Tiled Floor After Cleaning
 

Reproduction Victorian Tiled Floor cleaned and re-sealed in Dorset

Reproduction Victorian Tiled Floor Cleaned and Sealed Read More »

Travertine Floor Before and After Cleaning

Cleaning an antiqued style Travertine tiled floor

I had a call from a lady who wanted the Travertine tiled floor in her kitchen cleaned, the Travertine tiles actually extended further into the adjacent room but in this case it was only the kitchen she was concerned with. The sealer that had been used on the floor was ‘Lithofin Stain Stop’ which is sold primarily to the domestic market; it’s an appropriate sealer for Travertine but in a high traffic area such as this kitchen it had been worn down allowing dirt to get trapped in the Travertine.

Antique Terracotta Before Photo Antique Terracotta Before Photo

Cleaning a Travertine Tiled Floor

The remaining sealer was easily removed using a strong solution of Tile Doctor Pro-Clean which is a heavy duty cleaner and stripper. I removed the kick boards from under the kitchen units and then proceeded to work in the Pro-Clean using a rotary machine fitted with a black scrubbing pad. This was followed up with a manual scrub of the grout lines using a stiff brush as machines struggle to reach into the dip between the tiles. Once clean the dirty solution was removed using a Vet Vacuum and then washed down a number of times with clean water to neutralise the floor before re-sealing.

Sealing Travertine Tiles

Since this was a relatively small area of a 60m2 we re-applied the same sealer to ensure it would match up the rest of the floor. Personally for Travertine I always recommend Tile Doctor Ultra-Seal which is a penetrating sealer giving a natural finish especially designed for food preparation areas such as kitchens, another option to consider is Tile Doctor Colour Grow which brings out the deep colour in the stone.

Antique Terracotta After Photo Antique Terracotta After Photo

The customer was pleased with results and will most likely be asking us to return later to strip back the entire floor and re-seal.

Cleaning a Travertine Tiled Floor in a Kitchen

Cleaning an antiqued style Travertine tiled floor Read More »

Sealed with Pro-Seal

Sealing Reproduction Victorian Tiles

These Victorian Tiles had been laid in a hallway floor of a house in Dorchester ten years prior and sealed with what turned out to be an impregnator that had long ago lost its strength through oxidation and years of cleaning with flash which is far too strong and attacks sealers. What was left of the sealer was easily stripped off with Tile Doctor Pro-Clean agitated using a rotary scrubber and then washed down with a hot pressure wash.

Before Restoration During Cleaning

Sealing Victorian Tiles

We offer the customer a choice when it comes to choice of sealer as there are a number of sealers we recommend and each one can leave a different finish, we can also apply a sample of the different sealers to a few tiles but it isn’t always a reliable way of telling the difference. In this case we sealed the Victorian tiles with 8 coats of Tile Doctor Seal & Go which is ideal for Victorian tiled floors and leaves a low sheen finish.

Sealed with Seal & Go for a traditional finish
However the story doesn’t end there, the customer decided the Victorian tiles looked too shiny and wanted a more matt finish. It’s the customer’s choice in the end so we removed the Seal and Go and sealed the tiles again using Tile Doctor Pro-Seal which is a no-sheen, natural look penetrating sealer and the results were great. For regular cleaning of sealed floors we recommend using a Neutral PH cleaner such as Tile Doctor Neutral Cleaner.

Sealed with Pro-Seal

Cleaning and Sealing Reproduction Victorian Tiles in Dorchester

Sealing Reproduction Victorian Tiles Read More »

=================================

Dorset Tile Doctor

================================= Read More »

Scroll to Top