Author name: Stuart Tibu

Covering Dorset, Stuart Tibu is your local specialist for tile cleaning, stone cleaning, grout cleaning and tile, stone and grout sealing covering the restoration of all types of stone and tiled flooring including Ceramic, Limestone, Marble, Porcelain, Quarry, Sandstone, Slate, Terracotta, Terrazzo, Travertine and Victorian tile

Commercial Travertine Tiled Floor Before and After Polishing Bournemouth

Polishing a Travertine Floor for a Bournemouth Building Society

This is a great example of a commercial floor we were asked to maintain recently for the Bournemouth branch of the Nationwide Building Society. Bournemouth is a busy seaside town with a lovely beach and some notable Victorian architecture. As you can imagine being a building society the site is in constant use during the day with customers and staff coming and going. The work would therefore have to be done overnight in stages working in different areas every evening until complete.

Nationwide Building Society Office Bournemouth

The floor was Travertine which is a very durable stone and ideal in heavy traffic areas such as this, but it needs to be protected with a sealer to prevent dirt becoming ingrained in the pores of the stone. Being such a busy commercial floor, the sealer gets a lot of wear so the floor needed polishing and then resealing to keep it looking good.

Travertine Tiled Floor Before Cleaning Nationwide Building Society Bournemouth Travertine Tiled Floor Before Cleaning Nationwide Building Society Bournemouth

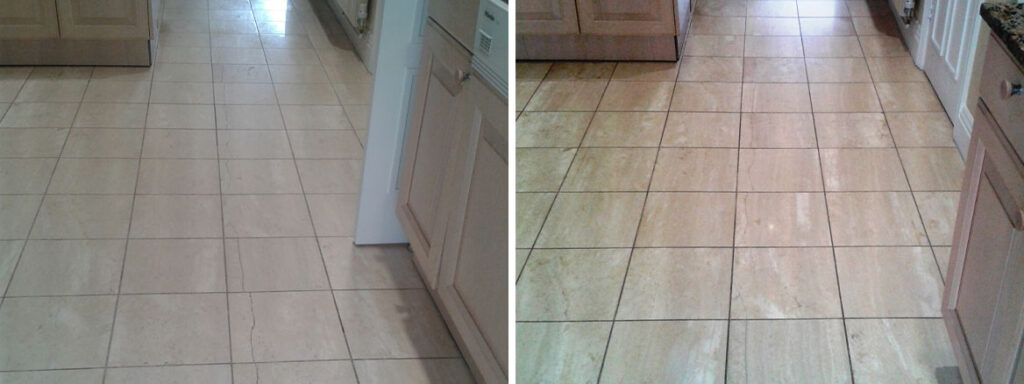
Cleaning and Polishing a Travertine Tiled Floor

To get the floor clean and hone the stone to a polished appearance we use a set of Diamond impregnated burnishing pads which are run over the floor with a floor buffer. Tile Doctor do a set a of four which include 400, 800, 1500 and 3000 grit pads and are ideally suited for the purpose.

Travertine Tiled Floor During Cleaning Nationwide Building Society Bournemouth

The pads are applied with water for lubrication and in sequence starting with the coarse 400-grit, medium 800-grit and then fine 1500-grit pad. If you are familiar with grades of sandpaper used on wood, then you will appreciate that this is a similar kind of process. The floor is rinsed with more water in between each pad to remove the slurry that is generated and then extracted from the floor using a powerful wet vacuum. The last pad to be applied is the very fine 3000-grit which is applied with only a little water sprayed onto the tile and this really brings up a deep shine on the Travertine.

Travertine Tiled Floor During Polishing Nationwide Building Society Bournemouth

Sealing a Travertine Tiled Floor

After the floor was dry, we applied two coats of Tile Doctor Colour Grow impregnating sealer that works from within by occupying the pores in the stone for maximum protection. Tile Doctor Colour Grow is also a colour intensifying sealer which provides durable surface protection, as well as enhancing the colour of the floor bringing out the natural tan and cream colours. Colour Grow is also a breathable sealer that allows moisture to rise through the floor however being a new building this would unlikely to be a factor.

Travertine Tiled Floor After Polishing Nationwide Building Society Bournemouth Travertine Tiled Floor After Polishing Nationwide Building Society Bournemouth

As you can see from the pictures the results were amazing and the client was very pleased! They commented how smoothly the process had gone and how accommodating we had been coming in overnight. Hopefully there are many more branches that may require our services!


Professional Polish and Seal of a Commercial Travertine Floor in Dorset

Polishing a Travertine Floor for a Bournemouth Building Society Read More »

Terracotta Tiles Before After Deep Cleaning and Sealing Poole

Terracotta Tile and Grout Deep Cleaned in Poole

The photographs below are of Terracotta tiled floor at a house in the coastal town of Poole, Dorset that had not been professionally clean in some time and having seen years of wear and tear from the active family who live there was not looking its best.

Terracotta Tiled Floor Before Cleaning Poole

The Terracotta had previously been treated with Wax which had now pretty much been worn off and the grout had gone dark with the dirt. We often find wax being used traditionally as a coating on Terracotta however a lot of science has gone into developing sealers in the last twenty years that do a much better job so Wax is not something we could recommend these days.

After surveying the floor and running several tests I was happy what was left of the wax could be removed and provided the customer with a quote for stripping the floor and resealing. The quote was accepted, and we arranged a date to return and carry out the work.

Terracotta Tiled Floor During Cleaning Poole

Cleaning Terracotta Tiles

The floor was covered in a strong dilution of Tile Doctor Pro-Clean and this was left to dwell on the floor to allow it to soak into the tile and get to work on the dirt and breakdown the dirt and what was left of the wax. The solution was then worked into the tile and grout using a heavy 17″ rotary scrubbing machine fitted with a black scrubbing pad and then rinsed off using a high-pressure tool that also extracts the soil at the same time.

The grout was cleaned using more Pro-Clean and a stiff brush that was run along the grout lines. After rinsing and extracting again the floor was inspected to look for any outstanding issues. This highlighted several areas where Wax residue was still present on the tile which were spot treated using a new tile product called Tiled Doctor Wax Away which as its name suggests is designed for the purpose.

After another rinse and extraction, the floor was inspected again and this time happy with the floor it was left to dry off fully overnight with the assistance of an air mover.

Sealing Terracotta Floor Tiles

Returning the next day, the floor was checked first with a damp meter to ensure it was dry and ready for sealing. The moisture readings were all good, so I set about sealing the Terracotta using three coats of Tile Doctor Seal and Go which is a water-based sealer that adds a robust and deep finish to the tiles. This can take some time to apply as you have to wait thirty minutes to allow the first coat to dry before applying the next.

Terracotta Tiled Floor After Cleaning and Sealing Poole

I’m not sure the photographs do it justice, but the homeowners were “over the moon” with the difference in the floor and regretted leaving it so long before calling us in.


Terracotta Tiles Deep Cleaned and Sealed in Dorset

Terracotta Tile and Grout Deep Cleaned in Poole Read More »

Chinese Rough Slate Before and After Cleaning Dorchester

Cleaning and Sealing Rough Chinese Slate Floor Tiles in Dorchester

The photographs below are of rough Chinese Slate floor tiles installed at a house in Dorchester; they had not been deep cleaned in a long time and the combination of pets and grandchildren had taken its toll on the floor. Rough Slate from China is a relatively inexpensive product and although long lasting and value for money the texture of the Slate is difficult to maintain and thus difficult to keep clean even if fully sealed

Chinese rough slate before cleaning Dorchester

Cleaning Chinese Slate Tiles

To clean the tiles I used a strong dilution of Tile Doctor Pro-Clean which was left to soak into the Slate for a good ten minutes before working it in with a buffing machine fitted with a black scrubbing pad. This action removed the ground in dirt and any old sealer and a stiff brush was then run along the grout lines with more Pro-Clean to get them as clean as possible. The floor was then rinsed thoroughly and any stubborn areas retreated; a wet vacuum was used to extract the soiled water from the surface of the stone in order to get it as dry as possible.

Sealing Chinese Slate Tiles

The floor was left to dry overnight and I returned the next day to seal using three coats of Tile Doctor Seal and Go sealer which is a water based sealer (so no smell) that leaves a nice subtle shine to floor.

Chinese rough slate after cleaning Dorchester
The slate and the grout looked really dull and dirty before we started and now the floor looks like it was recently laid.

For aftercare we don’t recommend the use of a Floor Steamer as they work on a 100 degrees and this damages the sealer; for regular cleaning use Tile Doctor Ph Neutral Cleaner using a two bucket system, whereby you apply the cleaning solution with a jug, wipe the floor and then squeeze off the excess into the second bucket, this stops you reapplying dirty water onto a clean floor..

Chinese Slate Tiled Floor Cleaned and Sealed in Dorset

Cleaning and Sealing Rough Chinese Slate Floor Tiles in Dorchester Read More »

Black limestone patio test clean patch in Broadstone

Cleaning and Sealing A Black Limestone Patio in Broadstone, Dorset

Earlier in the year I was contacted by a client down in Broadstone (a town supposedly named after a local legend) to revamp 100 square metres of black Limestone patio, which hadn’t looked right ever since it was first laid. The main problem was water ingress where water had been allowed to seep into the stone due to a poor sealing job. This had caused natural salts to form, and the resulting rough surface had collected grout haze at installation. I decided to run a test on a small patch of the patio to determine the best methods for cleaning and removing the grout haze.

Cleaning Limestone patio with water ingress and grout haze

I decided to conduct my test on just one square metre of the Limestone patio. First of all, I used Tile Doctor Grout Clean Up on the grout, a cleaner which helped to remove the grout haze by penetrating beneath the surface and lifting the muck out.

After cleaning the grout I moved onto cleaning the tile itself, using a solution of Tile Doctor Pro-Clean and clean water in combination with a black buffing pad. After achieving some great results with this cleaning method, I left the test area to dry completely before the seal, as any excess moisture left on the surface could potentially affect the performance of the sealer.

Sealing the Limestone patio

My choice of sealer was Tile Doctor Colour Grow. Colour Grow is a multi-use product which works well on both internal and external unpolished surfaces. One of the great things about Colour Grow is that it is a colour intensifying sealer, meaning it really helped to bring out the black colour in the Limestone which had previously been affected by dirt and water ingress. The sealer will also provide durable protection against these types of problems in the future.

black limestone patio test clean patch in Broadstone
As you can see from the photos, the result of my test was very good – the stone became almost completely black once again, and the defects in the grout were successfully removed. Nonetheless, I decided to leave the test patch for a month to see how well it withstood the effects of the weather. The test patch proved very durable – proving that the sealing had been done properly this time – and my client subsequently hired me to restore the remaining 99 square metres of patio!

Cleaning a Stone Patio in Dorset

Cleaning and Sealing A Black Limestone Patio in Broadstone, Dorset Read More »

Travertine tiled floor Before and After cleaning in Sandbanks

Repairing and Sealing a cracked Travertine tiled floor in Sandbanks, Poole

Every now and again, I get a call from a client located on the small peninsula of Sandbanks, Poole. Sandbanks, sometimes referred to as ‘Britain’s Palm Beach’, is known for its fantastic beach and high value property. My client asked me to take a look at a Travertine floor in his kitchen which was, in fact, more highly polished than he had wanted. The polished finish had worn off the travertine tiles where they had been walked on, leaving a dull trackway running down the centre of the kitchen. With its distinct characteristics, travertine is a popular choice for kitchen flooring, although it is also quite often used in bathrooms. In any case Travertine tiles will need regular maintenance to keep them looking their best.

Travertine tiled floor before cleaning in Sandbanks
Unfortunately, the kitchen floor must have experienced some sort of settlement or shrinkage as a long crack has appeared, which ran along the same line as the dull trackway. It is not uncommon for Travertine tiles to crack due to wear over time, or even bad fitting in some cases. While the exact cause of the crack was unclear, the homeowner concluded that the floor was certainly in need of restoration.

Repairing a crack in a Travertine tiled floor

Replacing the Travertine tiles was not an option due to a lack of spare tiles, so I opted instead to fill the crack in the floor using Harbro Stone Filler, an epoxy stone filler, matching the colour of the tile as closely as possible. I left this to set, before sanding down the excess filler.

My next action was to use a set of Tile Doctor Diamond burnishing pads to sand out any scratches and restore a more even shine to the floor, as per the client’s request. For polished stone, I recommend using a set of four burnishing pads applied in order: Coarse, Medium, Fine, and Very Fine. I used these one after the other with a little water to lubricate and restore the surface polish to the desired level.

Sealing a Travertine tiled floor

The next day, I returned to seal the floor with a couple of coats of Tile Doctor Colour Grow sealer. Colour Grow is a colour enhancing, impregnating sealer which penetrates deeply into the pores of the stone, thereby preventing dirt from becoming ingrained within. This particular sealer also enhances the natural colours within the Travertine tile, whilst also providing long term durable protection.

Travertine tiled floor after cleaning in Sandbanks
Although the crack could not be made to disappear completely, its appearance was much improved. The customer was also very pleased with the long-lasting lower sheen provided, describing it as “the finish I had wanted in the first place when the tiles were fitted”.

Cracked Travertine Tiled Floor Repaired in Sandbanks, Poole

Repairing and Sealing a cracked Travertine tiled floor in Sandbanks, Poole Read More »

Portland limestone patio round island during

Removing Glue from a Portland Limestone Patio in Poole Harbour

This Portland Limestone patio on Round Island in Poole Harbour had, together with a sun room indoors, been covered in a thick layer of carpet glue which had set hard in the warm sun over the years and the owner had found it impossible to remove themselves. There’s no bridge so the island is serviced via a boat from the mainland, which as you can imagine made it a bit of a task getting all my equipment over there.

Cleaning Portland Limestone Flagstones

I began by using 17″ Starke Silicone carbide discs which at 24 grit are much coarser that the burnishing pads we usually use. To get the right level of traction I used the disks on a Numatic buffing machine that had been weighted down and the combination worked well to cut through the glue and turn as much as possible of it to dust.

Portland limestone patio round island begin
To remove the remaining glue I soaked the Limestone in a dilution of Tile Doctor Remove and Go and left on the glue overnight under sheets of plastic and dust sheets so it wouldn’t dry out it. It also ensures the product remains in contact with the glue and kept it away from any wildlife which might use the patio when I wasn’t there.

The next day the remaining glue had softened and I removed as much as I could using a black buffing pad attached to the buffing machine together with a strong dilution of Tile Doctor Pro-Clean before applying more Remove and Go again and steaming each tile in turn whilst brushing with a brass coated Spid wire brush.

Portland limestone patio round island during
This was quite a lot of work and as the stone was not dense and had wide pores the glue had sunk in deep when it was applied and I had to repeat this process several times before the stone was clean. Finally I used a pressure washer to thoroughly rinse and clean the stone before re-pointing where necessary.

Portland limestone patio round island finished
 

Portland Limestone patio deep cleaned in Dorset

Removing Glue from a Portland Limestone Patio in Poole Harbour Read More »

Concrete Floor Bridport Covered in Bitumen Before and After cleaning

Bitumen removed from a Concrete floor in Bridport

This Concrete floor at a house in the market town of Bridport had been coated in bitumen which the owner wanted removed. The property had only recently changed hands and the bitumen had been used as an adhesive to hold down the previous flooring which the new owner had removed during renovation. Removing the Bitumen however was a different matter and hence we got the call.

Concrete Floor Bridport Covered in Bitumen before cleaning

Removing Bitumen from Concrete

Tile Doctor has a product for most things in its range and I’m happy to say I was able to clean up the floor using Tile Doctor Remove and Go which was left to soak into the bitumen to soften up before attacking it with a black pad fitted to a Numatic buffing machine which was weighted down to improve traction.

Some areas were stubborn to remove as you can imagine so to soften it further I used an Earlex Steamer and finally a Tile Doctor Diamond encrusted burnishing pad to cut into the concrete very slightly and remove most of the bitumen that had sunk below the surface.

Concrete Floor Bridport Covered in Bitumen after cleaning
The results were as good as they could be and the customer was very pleased as she said it made the whole room look much lighter.

Removing Bitumen from a Concrete floor in Dorset

Bitumen removed from a Concrete floor in Bridport Read More »

Portland Limestone Tiled Floor Before and After Sealing Weymouth

Old Black Portland Limestone Flagstones restored in Weymouth

Apologies in advance for the quality of the photographs below, they were taken in the sitting room of an old 18th century cottage near Weymouth and the lighting was not its best, although I’m sure fans of the TV series Poldark would have loved it. The floor was 20m2 Portland Limestone flags which hopefully you can see was not looking its best and I suspect it had been some time before it had been given a thorough deep clean as it was now grey, grimy and generally tired.

This type of floor is quite common in houses before the 19th century and usually consisted of the beaten earth being covered with thick slabs of stone. When left over time it becomes grey and dry and flaky but when cleaned and sealed it turns almost as black as its near relative Purbeck marble and even shines when polished.

Portland Limestone Tiled Floor Before Cleaning Weymouth

Cleaning Portland Limestone Flagstones

To get the floor clean I applied a medium dilution of Tile Doctor Pro-Clean which was left to soak into the floor for about ten minutes before being scrubbed in with a black scrubbing pad fitted to a Numatic buffing machine. I also ran a stiff narrow brush along the grout lines to get them clean.

The floor was rinsed down with water to dilute the now soiled cleaning solution and this was extracted using a wet vacuum. To add a little polish to the Limestone I ran over the stone using a fine diamond encrusted burnishing pad, the floor was still a little damp which helped lubricate the process. Once done the floor was given another rinse again using the wet vacuum to remove as much liquids as possible before leaving it to dry off fully overnight.

Portland Limestone Tiled Floor After Cleaning Weymouth

Sealing Limestone Floor Tiles

The next day I sealed the floor using two coats of Tile Doctor Colour Grow sealer which impregnates the pores of the stone to provide lasting protection. The floor now looks clean and bright and a lot closer to the near-black colour that it should be.

Portland Limestone Tiled Floor After Sealing Weymouth
 

Black Limestone Floor Polished and Sealed in Dorset

Old Black Portland Limestone Flagstones restored in Weymouth Read More »

Terrazzo Tiled Floor Before and After Cleaning in Southbourne

Old Terrazzo tiled hallway floor restored in Southbourne

I do enjoy breathing new life into old floors as was the case with this Terrazzo tiled hallway floor in Southbourne near Bournemouth, installed in 1924 it had been knocked about by various building alterations and then finally covered in a carpet which had been glued to the floor.

Terrazzo Tiled Floor Before Cleaning in Southbourne

Removing Adhesive from Terrazzo tiles

Stubborn remnants of the carpet adhesive were removed using Tile Doctor NanoTech HBU Remover which is applied to the tiles and then left to soak in for a before being scrubbed in with a black buffing pad and a dilution of Tile Doctor Pro-Clean. HBU actually stands for Heavy Buid-up Remover and it’s a great problem solver that penetrates through tough stains and coatings so they can be easily removed. The floor was then washed down with clean water and any areas that needed further attention were retreated until I was satisfied with the floor was clean and free of glue.

The next step was to re-polish the Terrazzo using a set of of Tile Doctor burnishing pads which are applied in sequence from Coarse through to Super Fine with a little water to help lubricate. The coarse pad removes any surface grime and old sealant and the remaining pads build up the polish to bring back the original shine. The floor is washed down between each pad to remove the soil generated during the process.

Sealing Terrazzo Tiles

Cleaning took most of the day so I returned the next day to apply the sealer testing the floor first to ensure it was dry. To seal the floor I used a couple of coats of Tile Doctor Colour Grow which is a colour enhancing sealer that impregnates into the pores of the stone and prevents contaminates staining the floor.
The customer decided that she would conceal the concrete patches at the edges of the floor using Colours Stone Effect speckled spray paint which is available in B&Q in her own time.

Terrazzo Tiled Floor After Cleaning in Southbourne
As you can see from the photos the floor looked a hundred times better and the customer was very satisfied with the result.

Restoring a 1924 Terrazzo Tiled Floor in Dorset

Old Terrazzo tiled hallway floor restored in Southbourne Read More »

Stained Marble Table Top Before and After

Stained Marble Table Top

This beautiful Marble Table Top belonged to a lady living in Sturminster Newton whose slate floor I was restoring and she happened to ask me about the surface staining. She had had a quote from a stone mason who had said he would take it away, grind it, and bring it back which as you can imagine would not of been cheap.

Stained Marble Table Top Before

Polishing a Marble Table Top

Unlike the stone mason I was able to restore the Table Top without moving it from the dining room using a set of six inch burnishing pads. I started the process with a yellow polishing pad with a water and then moved onto a green pad applied with a fine water spay. The results were outstanding; it’s unfortunate however that the results of my photography wasn’t as good otherwise you could appreciate the results more. The customer was very pleased In fact she had this table and her 30sqm of Slate floor restored for less than the stonemason wanted to restore her table top.

Stained Marble Table Top After
 

Stained Marble Table Top re-polished in Sturminster_Newton

Stained Marble Table Top Read More »

Slate Floor Cleaned and-Sealed

Cleaning and Sealing Slate Tiled Floor

It helps to know the cleaning and sealing history of the floor, knowing this information can help with cleaning and sealing decisions. In this case however the slate tiled floor had been laid 15 years prior in a house in Sturminster Newton, around the time the house was built and had not been resealed since so that information was long forgotten.

Cleaning the Slate Tiled Floor

After testing I found it had been sealed with a wax based product which could easily be removed with Tile doctor Pro-Clean. I applied the pro-clean and agitated the solution and scrubbed the floor with a rotary scrubber followed up with a good rinse and hot pressure wash to remove any remaining solution.

Slate Floor Cleaned and Sealed

Sealing the Slate Tiled Floor

After leaving the slate to fully dry for a few days the floor was sealed with Tile Doctor Seal and Go which is a topical sealer as opposed to a penetrating sealer. This low sheen sealer still has a adds a little shine and brings out the colour and darkens the slate tile. Interestingly enough she loved it but her husband hated it which just goes to show you can’t please everyone.

Slate Floor Cleaned and-Sealed
It wasn’t long before I got a referral to do the same work on the house next door, both floors were identical and after seeing the first one done the neighbour was keen for me to do hers. The job was the same but the neighbour preferred the raw rustic look of the slate prior to sealing so she chose to go with Tile doctor Ultra Seal which offers good protection but leaves a strong virtually invisible seal.

Both the photographs on this page are from the first house, unfortunately I forgot to take a photograph from the second floor to demonstrate the difference but basically it resembles unsealed slate.

Slate Tiled Kitchen Floor Cleaned and Sealed in Sturminster Newton, Dorset

Cleaning and Sealing Slate Tiled Floor Read More »

Sealed with Pro-Seal

Sealing Reproduction Victorian Tiles

These Victorian Tiles had been laid in a hallway floor of a house in Dorchester ten years prior and sealed with what turned out to be an impregnator that had long ago lost its strength through oxidation and years of cleaning with flash which is far too strong and attacks sealers. What was left of the sealer was easily stripped off with Tile Doctor Pro-Clean agitated using a rotary scrubber and then washed down with a hot pressure wash.

Before Restoration During Cleaning

Sealing Victorian Tiles

We offer the customer a choice when it comes to choice of sealer as there are a number of sealers we recommend and each one can leave a different finish, we can also apply a sample of the different sealers to a few tiles but it isn’t always a reliable way of telling the difference. In this case we sealed the Victorian tiles with 8 coats of Tile Doctor Seal & Go which is ideal for Victorian tiled floors and leaves a low sheen finish.

Sealed with Seal & Go for a traditional finish
However the story doesn’t end there, the customer decided the Victorian tiles looked too shiny and wanted a more matt finish. It’s the customer’s choice in the end so we removed the Seal and Go and sealed the tiles again using Tile Doctor Pro-Seal which is a no-sheen, natural look penetrating sealer and the results were great. For regular cleaning of sealed floors we recommend using a Neutral PH cleaner such as Tile Doctor Neutral Cleaner.

Sealed with Pro-Seal

Cleaning and Sealing Reproduction Victorian Tiles in Dorchester

Sealing Reproduction Victorian Tiles Read More »

Before and After Sealing

Cleaning Terracotta Tiles Marked With Dirty Boot Prints

I had a rather long conversation with this worried terracotta flooring customer in Weymouth. This was a new installation of around 30 m2 of terracotta tiles. The tiler had laid the tiles and was in the process of sealing with a rather nasty rubber based yellow coloured sealer when his assistant walked through from outside with dirty boots. Being a very absorbent tile the dirty prints penetrated into the tiles within the sealer leaving lovely dirty chevrons all over the new floor.

To rectify this the tiler tried first of all with Nitromors and then with Gripex paint and glue strippers. Using these on any tile is not a good idea but on terracotta due to porosity all it was sink in and remain there along with the foot print. So at this point the tiler decided to try angle grinding one of the tiles which eventually he did manage to take out one of the prints although damaging the integrity of the tile. After visiting a tillers forum he was wrongly advised to sand the tiles with an industrial sander so he hired a sander for a day and set about sanding the tile back. After spending a fortune on sandpaper that just got gunked up with rubber sealer and a days of labour he had managed to sand around 5sqm and cover the whole house with orange dust…

This was when he said ‘ok enough is enough just don’t pay me for the tiling’ and walked off the job!

Before Restoration Before Restoration Before Restoration

I spent two days stripping the sealer out with Tile Doctor Remove and Go and cleaning with Tile Doctor Pro-Clean assisted with a rotary machine fitted with a scrubbing pad in order to remove both the sealer and the dirty foot prints. After a hot pressure wash to clear the pores and remove any remaining chemical from the floor we left it to dry for a week.

Sealing Terracotta Tiles

We sealed the Terracotta Tiles with Tile Doctor Seal and Go which is a low sheen water based sealer recommended for Terracotta floors. Terracotta is quite porous and in this case the tiles required a lot of sealer where tops had been sanded off and in the end it took 12 coats before if was fully sealed.

During Sealing After Sealing

The results were outstanding, you wouldn’t know that there had been any damage at all and the customer was very happy, not only that the job cost less than what was due to the tiler.

Terracotta Tiles Restoration in Weymouth

Cleaning Terracotta Tiles Marked With Dirty Boot Prints Read More »

=================================

Dorset Tile Doctor

================================= Read More »

Scroll to Top